Introduction to Helpdesk
User permission settings
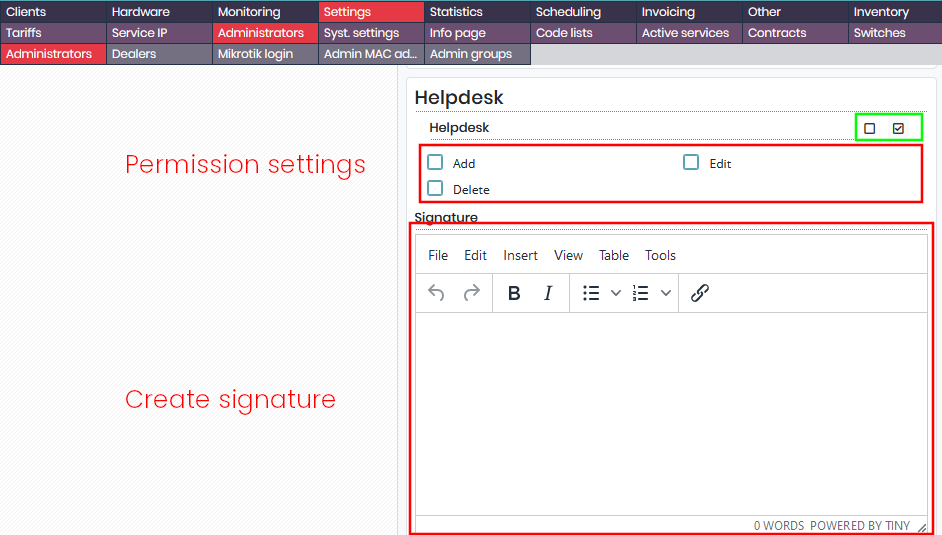
In Settings / Administrators / Administrators, it is necessary to set appropriate permissions for individual users. On the left-hand side, you can find global settings with the help of which you can allow the user to create, edit and delete tickets. The Add permission must be checked for the user to be able to really use Helpdesk.
In addition, it is necessary to enter a user signature. This signature is automatically used when new tickets are created or when replies are sent to clients.
In green box (see image) is possible check/uncheck group of checkboxes related to Helpdesk.
Basic Helpdesk settings
Add status
In Helpdesk / Settings / Status, you can create ticket statuses using the Add button. You have to create at least one status before you can create a new department, because there is a required item Default status in the department configuration form. For example: New, Open and Closed. At this point, you cannot use the Restrict to department setting because there are no departments in the system yet. You can come back later to change the setting.
The Move option in the status list allows you to bulk change the status of individual tickets from one particular status to another. This feature might come in handy when you want to delete a status. A status can only be deleted if there are no tickets with this status in Helpdesk.
Add priority
Another step consists in creating priorities. You have to create at least one priority before you can create a new department. In the future, it will be possible to use the created priorities for SLA and ticket escalation purposes. The Move option works the same way as in the status list: It allows you to bulk change the priority of individual tickets from one particular priority to another. A priority can only be deleted if there are no tickets with this priority in Helpdesk.
Add department
A department can be thought of as an email client account. ISPadmin logs in to the email account via IMAP or POP3 protocol, downloads received emails and deletes them from the server! This way, ISPadmin frees up server space and ensures low-maintenance operation. If you want to keep copies of the received emails, it is necessary to create an email alias (for example: support@xy.com) and have the emails forwarded to two different email accounts (for example: support1@xy.com and support2@xy.com). You then have to configure ISPadmin to download and process emails from one of the accounts only.
Settings:
- Department name – Name of the department that is displayed throughout Helpdesk
- Color – Color coding to distinguish between individual departments
- Email address – Outgoing email address (Email address from which emails from the department are sent. For example: support@ispadmin.eu)
- Email address name – Name of the sender (Name that is displayed in the client’s email account. For example: Support ISPadmin)
- Default status – When a new ticket is created from an incoming email, this status is assigned to it.
- Default priority – When a new ticket is created from an incoming email, this priority is assigned to it.
- Automatic reply – Automatic reply: Yes / No. When a new ticket is created from an incoming email, this text is automatically sent to the client.
Email server configuration:
- Host – Email server address
- Username – Username, usually email address
- Password – Password
- Protocol – IMAP or POP3. In both cases, received emails are deleted from the email account!
More user permission settings
With the initial configuration out of the way, it is necessary to change the permissions for the individual departments on the user permission settings page. The user that can create new departments has the permissions already. Other users do not. You need to change the settings manually.
Further settings
There are other settings that are not essential for Helpdesk to work, but they make ticket handling much easier.
Parser / Separators
Each reply from a client contains the part of the preceding communication that the client is replying to. As the text becomes longer, it makes reading the actual messages harder.
You might want to get rid of the original messages. For that purpose, you can use regular expressions such as „/^.+ISP admin Support TEAM.+/i“ and the type Breakline. Based on this rule, the system finds the corresponding string and deletes it and everything after it.
- Strip – Delete the text found from the email
- Breakline – Delete the text found and everything after it
Ban
List of banned email addresses + option Add ban. You can ban email addresses directly from the ticket list to prevent emails from specific senders from being processed.
Labels
Here you can manage all the labels used in Helpdesk. Each label has its own name and color. There is also an option to restrict a label to a particular department. You may not need (or want) to have the same labels in all your departments. Labels can be used for filtering purposes.
Templates
Here you can create email templates for later use (frequently used replies). Templates can be used when you are in the process of creating a new ticket or replying to an existing one. You can put them into various categories to make it easier to find the right one.
Filters
Management of the logged-in user’s filters. Here you can add and edit individual filters. A filter may represent one rule or a combination of rules. The filters are then used to display only those tickets that have the requested properties. For example: Display all unclosed tickets assigned to the user.
Ticket list
On the left-hand side of the page is a sidebar divided into 4 sections:
- Filters – Logged-in user’s filters
- Drafts – Saved unfinished emails
- Departments – Departments and corresponding statuses (predefined filters)
- Labels – Labels (predefined filters)
To the right of the sidebar, you can see a list of tickets that match the filtering criteria. By default, you can see everything (all tickets in all the departments you have permissions for).
There are further filtering options above the individual columns. You can change owner, priority, status and department directly from the ticket list.
New ticket
When you click on the Create ticket button, a window appears in which you can create a new ticket. The following types of tickets are on offer: Email, SMS and Phone. The most options are available for email tickets (core Helpdesk feature). SMS and phone tickets are to be created manually by the user. They are used to keep track of the entire communication process with a particular client.
When a new email ticket is being created, the required fields must be filled (Email address and Subject). You can enter more than one email address into the field provided. Individual addresses must be separated with a comma, though.
Furthermore, you can specify Cc and Bcc (if necessary) and attach files to the email. You can enter a predefined text into the form using one of the templates created in the system.
When you click on the Send button, a new ticket is created.
Ticket management
A ticket consists of a series of messages displayed in chronological order (from the newest to the oldest). If there is a blue icon next to the name, it means that the message in question was sent by a staff member. If there is a green icon next to the name, it means that the message was sent by a client.
There is an HTML toggle on the right-hand side of each message that can be used if the text of the email seems to be formatted incorrectly. The Edit and Delete message icons are displayed only if you have the necessary permissions.
Replies
To reply to an existing ticket, you need to click on the Add reply button. The Sender and To fields are prefilled in the form displayed. You can change the value in the To field.
Ticket properties
There are 7 basic ticket properties:
- Ticket ID – Number preceded by #
- Subject – Subject follows Ticket ID
- Client – If the ticket has been matched to a particular client from the ISPadmin database
- Owner – Assignee, ISPadmin user
- Priority
- Status
- Department
By changing ticket properties in an appropriate manner, you make it clear what is to be done with individual tickets (based on your company policy). You can change department, assign the ticket to another owner, change priority, etc. The only two properties that cannot be changed are ticket ID and subject.
Labels
You can add any number of labels to individual tickets. These labels may then help you find the relevant tickets (filtering). Labels can be restricted to a certain department. In that case, only the relevant ones are offered.
Notes
A note can be added to one single ticket or to all the tickets linked to a particular client.
- Ticket notes – These notes are displayed in their respective tickets only.
- Client notes – These notes are linked to specific clients. If you add such a note to a ticket linked to a particular client, the note will be displayed not only in that ticket, but also in other tickets linked to the given client.
Reminders
When you are adding a reminder to a ticket, you can choose when the ticket is supposed to have its status changed and to which status it is to be changed. Example: Ticket with status Closed. Reminder set to February 1, 2030. Status to be changed to Open. On February 1, 2030, the ticket is moved to the top and its status is changed to Open. One of the users can take care of this newly updated ticket. When you set up a reminder, the Bell icon appears in the ticket header.
View history
When you click on the Eye button, a history appears of who and when viewed the ticket for the first time. You can use this feature, for example, when trying to find out who was the first user that viewed a particular ticket.
Ticket history
The Ticket history feature logs all the important changes and actions performed on the ticket. You can use this history to resolve potential disputes in the future.
Client card
In the Client card, you can find the entire history of communication between you and your client. You can also create a new ticket here. The conversation can be viewed by other Helpdesk users (if access to the same department has been granted to them).